Part 3:Building out the Story (Playbook) for automated response- Part A
To Recap: This is our General Flow Diagram. Here, we will be building out our playbook in Tines. The steps that we will include to complete this in our story should cover the steps outlined in red in our diagram below.

Let's begin this part of the series by establishing a connection between Slack and Tines. Then starting to work our way down building out our Automation in Tines from there.
Open the Slack workspace that we created and click on Automation. Add Tines.

It redirects us to this page which from here we can click add to slack.

It redirects us further to these instructions.
Complete the 3 steps mentioned in the documentation in your Tines tenant.


Click new and then Slack.

We are going to use the Tine's app for Slack

Click Allow.

You should now see the credential listed. Go back to the story (playbook) that we were creating.

After you are back in your story, navigate to Templates in the bottom left pane and search for slack template. Drag that template right under the webhook we created.

Click on slack and look for the message template.

Here we see the information we need to populate.

Go back to the Alert channel in slack to get the Channel ID.

At the bottom, copy channel ID.

Paste it in the channel id field of the Slack send message action by clicking on the Slack send message to Slack action > in the right pane paste in the channel ID. The Rectangular tiles in the workspace below are called Actions. They are apart of our workflow. Send a test message by clicking Run.

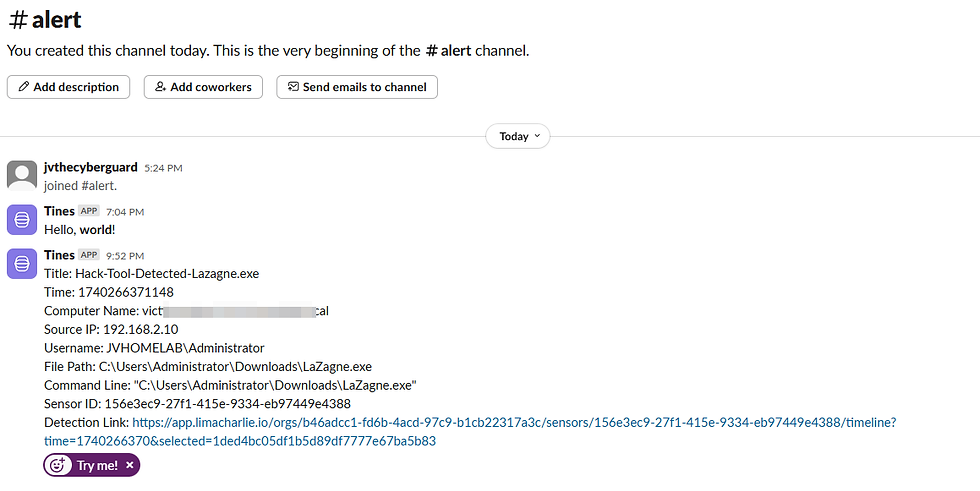
In the Alert channel we see the message from Tines.

Connect the webhook to Tines.

If you have issues triggering the message in Slack. Make sure the credentials we created in Tines are connected. Click on the slack template and click on the green icon next to slack. Also, check the logs. A troubleshooting step could be creating a new story (Tines calls them story but they mean SOAR playbook). You would also have to create a new Output in Tines because you would have a new webhook URL.

Let's next set it up to send emails.

Make sure to connect the webhook to the send email button. Enter your email in recipients and test to make sure it works.

Choose the most recent webhook. The id increases, so the most recent ID will be the higher number. Then click Test. We will do these kinds of steps very often moving forward so try to understand what you're doing so you can keep up as we move along. I try to do as much hand holding as possible with the aid of screenshots to help.


Press the down arrow by send_email_action we see that it was a success.

Now check your email. Email received.

Now that we confirm that the email and slack action works. The next step is to ensure the data from the detection rule is sent to the next action in the story which is to send an email and send the message to slack.

The way we get Slack and the Send email actions to get the fields from the detection would be to copy the variable names for the fields we want in the Tines Tenant to the message body for both the Slack Send message action and the Send email action.
Click on the webhook and then events.
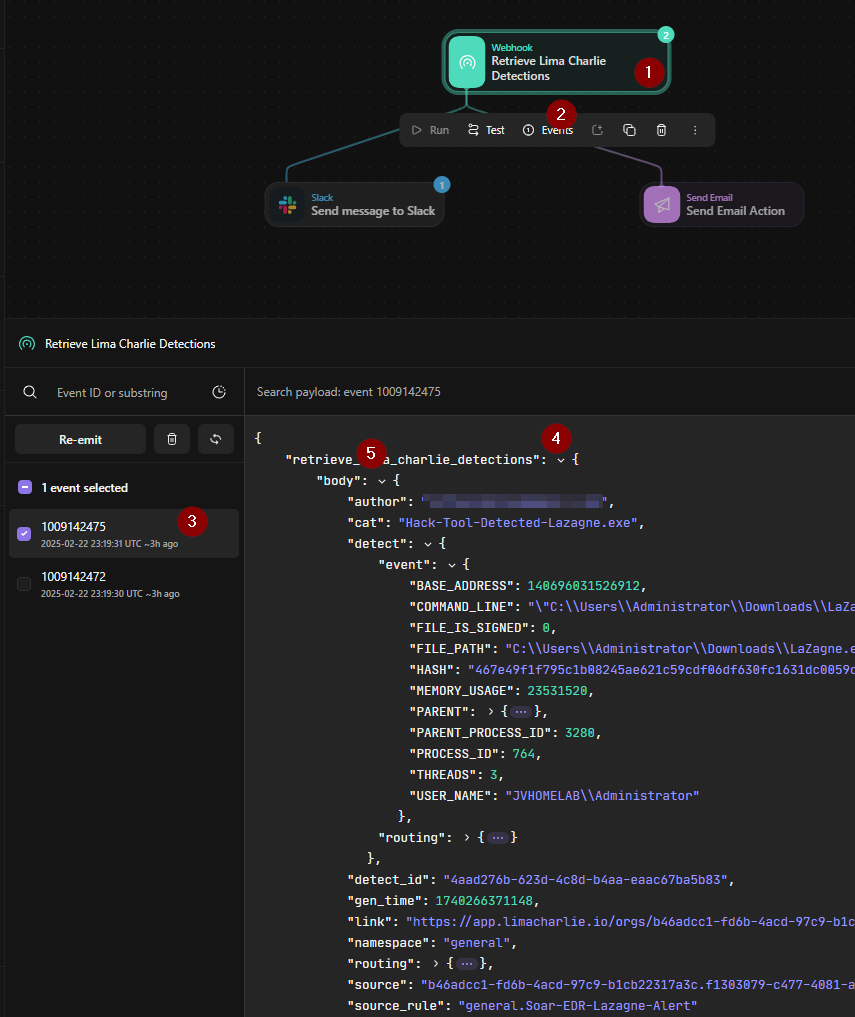
As you hover by each field we are interested in we see that we can copy. We will copy them to a note pad for now.

Look at how it is pasted in notepad. Cat matches the variable we need for title. This is how Tines recognizes the fields and inserting these fields in the body of the Slack email will allow the data to be retrieved from the webhook to be sent over Slack and Email through the Slack and Send email action.

Remember we said that message for Slack & Email will contain:
Time
Computer Name
Source IP
Process
Command Line
File Path
Sensor ID
Link to the detection (if applicable)
Best practice would be to also add a title field and username. Therefore, ideally the order of the details for the message should be as follows.
Title:
Time:
Computer Name:
Source IP:
Username:
File Path:
Command Line:
Sensor ID:
Detection Link:
At this point we are just copying and pasting to get the fields we need in a format to be placed in the body. You have to drill down in routing to get computer name and source IP

Sensor ID is sid in our log

Finally detection link is link.

Now copy the entire contents of your notepad into the body of the Slack message and test again.

Use the most recent webhook.


Tada! Go to Slack.
Copy and Paste and do the same for email.


Open Html editor. Since emails are in HTML format. We need to insert a break to help with the formatting other wise it will look like below.


Now Test.

Nice!

Next, we need to configure a page for user input. This way the analyst can provide input on if he he wants the machine to be isolated. Remember this stage of our workflow?

For this user interaction, we a going to use what Tines refers to as a page. Please see below.

Click visit page for us to take a quick preview.


Now let's edit the page.

On the edit page, we want a yes or no input from the user so drag a Boolean on to the page

Copy the variables from our detection rule again that should still be in your notepad and paste them in the paragraph contents, overwriting it.


Click on Boolean and change the name of it to the question, "Do you want to isolate?"

Lastly, change the page heading from my new page to SOAR EDR PROJECT by clicking on my new page section of the page itself.

Let's go back to our playbook.

And let's try to visit the page.

What do you see? Why are the fields not populated?

Did you notice what we did not do? Ahhh… We forgot to connect it to the webhook.

Connect and try again.


Yes, it works now. This reinforces how important it is to connect actions for the upstream or downstream of data.

To configure what happens when the Analyst says Yes vs when they say No We need a Trigger action. Disregard where my mouse is hovering below. Drag on the Trigger.

Drag it over and then connect it to the page action.

Clicking on Trigger will allow us to configure what should happen when a user clicks Yes or No for Isolation. Delete the info in the rules. Click the field and then press the plus. Then click Value.


Since the trigger is connected to the page action we just created we should be able to pull the field when a user clicks the button no.

No information is there as yet because we never clicked the No button. Let's visit the Page Action page again and this time click no and then submit.

Essentially, in layman's terms, we are trying to find where in the event stores whether the Boolean is holding a true or false value in response to the question-Do you want to isolate? In other words we are trying to find the Json Object path.
Go back to the trigger again. Click on Page action in the rules section; we should be able to drill down in the event generated to the path in the even to access the value where do you want to isolate is false.


In the last screenshot above we found it. That is the path to the value of the event that happens when a user submits yes to isolate or no to not isolate.
Ensure that there is not a period after. Always look to ensure the result in the bottom corner is what you are expecting. Below is an example of an error if you accidentally included an extra period.

So that is the path that we want. You can click out of it. We will now change the rule from saying this:

To trigger only if, the variable from the page action event has a false value stored.

According to our diagram, what should happen when this triggers is it send a message over slack saying to computer name was not isolated.

Copy the send message to slack action we created at the top of our playbook and paste it and connect trigger to it.


Drag both actions to the right just like in our diagram.
Now the message we want to deliver is.
“The computer <computer> has not been isolated. Please investigate.”
Resulting from copying the send message slack action we already configured above, we have all the fields like before. Remove all the fields except for computer name

Then draft the message accordingly including the computername variable from the event.

If you click test on the slack action, you will see something like this because this action has not received any inbound events as yet. It was last run before, the new Slack action was instantiated.

So what we have to do is take a step back regenerate the detection event.
We can have the webhook "re-emit" or send the event down the story again as though it just received it from Lima Charlie.
Click on webhook > Events >Select an event and then choose > Re-emit.
This is a technique we do often so if I don't mentioned it explicitly at some points remember how this is done.

You should see this confirmation below.

Why do we have to do this? Because we already handled those in the pipeline.
Now Go to the page action, Click visit page, select a recent event.


Click No on the page action, click Submit.

Our trigger (condition which we created) looks for a no. Click the trigger, "user says no" and go to logs, we see that we have a match and the event data will be passed on to the send a slack message action.

Now if we click test again. We see the inbound event from the trigger populated in the list and hostname variable in the body for the slack message will then be populated when delivered.


Click Test. Check in Slack now.

Good work! So this part is complete.
You might have noticed when you Re-emit the event at the webhook it completed all the flows that we configured. Check your email. Do you see a message there as well. Did you see the initial detection message from slack as well. Clearly we're making progress and it's working.
What happens if a user clicks yes? Isolate the machine?
This part of the series is getting really long so we will work on what happens if the user clicks yes in the next part of the series.
We will now continue building out the rest of the playbook. Check out part 4 below.
Good work!
Part 4: Building out the Story (Playbook) for automated response- Part B
Comentários