
What are the prerequisites for this lab? Have a working Windows VM whether that's hosted in the cloud or on your machine locally is up to you. Just choose a windows workstation that has internet. We will be using free software or free tiers, so money needed.
Introduction: Automating Security Response with Tines & Slack
In modern security operations, speed and automation are critical for effective incident response. This project explores how we can integrate LimaCharlie (EDR), Tines (SOAR), and Slack to create an efficient automated detection and response workflow. Initially, we used a Tines Page Action to prompt analysts for decisions, but later optimized the process by embedding interactive buttons in Slack for a more seamless experience. Along the way, we tackled string manipulation challenges, ensuring detection details were correctly passed and processed between tools. This hands-on approach not only introduced us to how EDRs generate detections but also demonstrated the power of automation in security operations, reducing response times and improving efficiency. In this series, we’ll walk through each step of the implementation, lessons learned, and how this workflow can be further enhanced for scalability.
Drafting our workflow helps to put things in perspective. Draw.io is a good tool to use for this.
Rough draft of the SOAR EDR playbook.
Story → Tines
Create detection in LimaCharlie – Detect HackTool → Tines → Slack & Email
Slack & Email will contain:
Time
Computer Name
Source IP
Process
Command Line
File Path
Sensor ID
Link to the detection (if applicable)
Tines → Prompt User to isolate the machine (Yes/NO)
If YES:
LimaCharlie should automatically isolate the machine
A message should be sent to Slack
Message: Isolation status with note of “The computer <computer> has been isolated”
If NO:
LimaCharlie will not isolate
Message: Isolation status with note of “The computer <computer> has not been isolated. Please investigate.”

Part 1: Setup LimaCharlie sensor and exploring the telemetry and benefits of the EDR
I will be using my HomeLab DC for this lab. I have maintained the Homelab I created on this page 2 years ago. You can find it here.
Navigate to LimaCharli.io Click logon.
LimaCharlie is a modern endpoint security platform built on a “security as a service” model, offering tools like Endpoint Detection and Response (EDR), log collection, and automated threat hunting. It’s designed with a pay-as-you-go philosophy—meaning you only pay for what you use—and there’s typically a free trial or limited free tier for getting started. This developer-friendly approach provides unparalleled flexibility and integration options, allowing teams to build exactly the security stack they need without vendor lock-in or rigid annual contracts.

Click sign up

Feel free to put whatever you'd like in here.

Click create Organization

Name the organization at this point but do not choose any templates.

You should see this screen but before we crate a sensor we are going to add an installation key.


You can name it the following.

Here we can add a sensor.

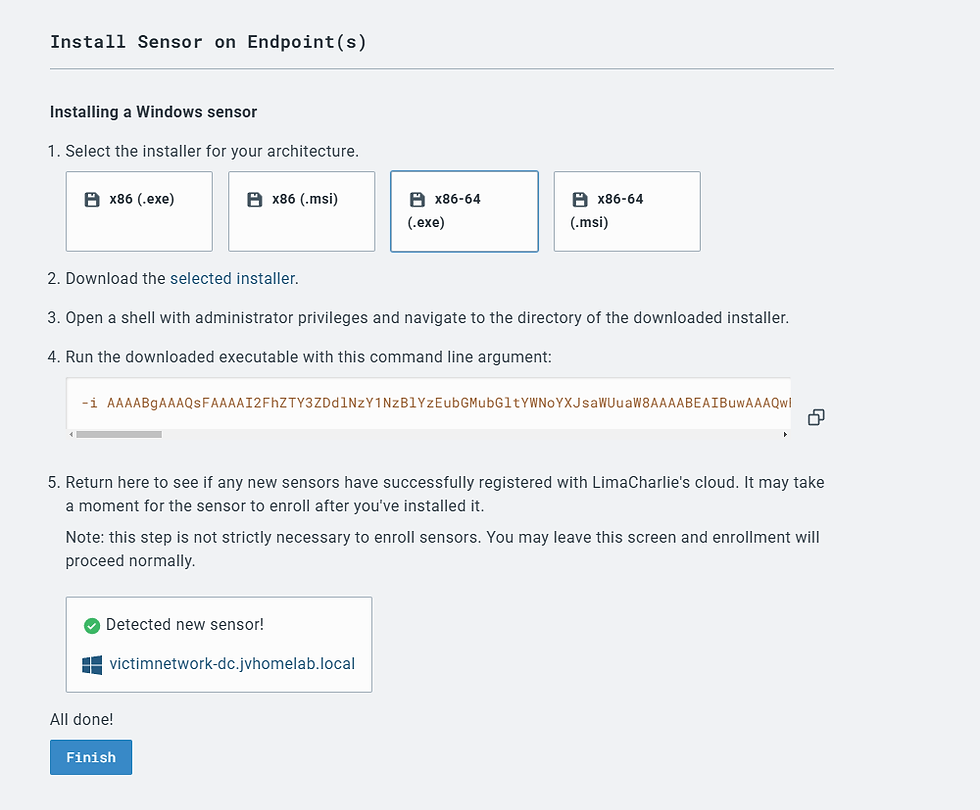
Next we select the sensor type Endpoint > Windows. The firewall configs necessary are specified.

Now select the installation key that we created.

Then it asks for architecture. Verify the architecture of your install by opening cmd and typing in ver or systeminfo


You can download the exe for the LimaCharlie Endpoint Sensor and then copy it into your server.

In cmd, Navigate to the folder where it is stored on your server and execute by appending the command line argument specified for your sensor executable installation. Like this:

Select yes for the UAC

We see over here now it is installed.
However, let's try to find using powershell on the server.
The first command we run is to see the properties we can filter on. Another option would have been Get-Member. From that we see that we can filter on Servicename or it's alias Name

Our next command will be. You notice the that the first two attempts did not work. The reason is that name of the service isn't actually Lima. It is the display name. So switching the property that I was filtering on is a troubleshooting step you may have to try in some instances.

Below are some other ways that you could have written it.

The good news though is that the sensor is running. Click finish below

You may have to refresh the page for it to populate in the list. Click on it.

So Lima Charlie is an Endpoint Detection and Response tool, and these tools are important to organizational security through endpoint security. Sensors installed on each endpoint monitors the device and conducts analyze endpoint activity using behavioral detection (suspicious patterns) and signature based detections (known Indicators of Attack).
The analysis is supported by LimaCharlie's cloud platform, which provides up to date threat intelligence, correlation analysis, and a central command for response actions. They also have the potential to respond to these threats through blocking malicious processes or isolating a compromised endpoint from the network. EDR tools like LimaCharlie for example also provides an analyst the opportunity to perform hands on keyboard activity as part of their investigation allowing the remediation of threats in real time.
Let's explore what information or telemetry LimaCharlie is gather that could be helpful to us in understanding how EDRs can be beneficial to us in an investigation. Feel free to explore the various options here.

A few highlights I will share will be console.. Which is where we can go hands on keyboard. Click on the field and press the up or down arrow to cycle through the commands available. Try netstat!

We can see files on the file system including the download that we just did of the sensor.

If running Netstat didn't work for you, it didn't work for me either initially.

Commands to the console were not working. So I opened powershell(Stop-Service -DisplayName Limacharlie | Start-Service as an administrator or you can go to services and stop and start the service.


It successfully stops but I realize it errors out starting back so you will have to manually restart it. Start-Service -DisplayName LimaCharlie

Let's try Netstat again. Netstat still doesn't work for some strange reason.

Now let's try OS users.

So, in a real world scenario I would probably just reach out to the vendor to help troubleshoot but we have to move on. I sent a support email to the vendor, however, when I tried to load the network tab I noticed this information.

So I decided to pivot on events in the docs.

Navigate back to the previous page.

To the default windows collection rules to make sure netstat was included and it was.

I then went back to Sensors List > Sensor we created > Event Collection


Hit refresh and the two highlight boxes above were now listed. Navigating to network page now shows the following output.

Another highlight in here that analysts enjoy is the process list and the ability to respond to threats identified in suspicious processes by executing any of the following options.

We opened PowerShell from the desktop and we can see that here. The PPID for PowerShell is the PID for Explorer.exe

What happens if I open an admin PowerShell windows from the PowerShell that we have open?

The EDR shows the new spawned child process of PowerShell.

When you run PowerShell as Administrator (or any console application like cmd.exe), it also often spawns conhost.exe (Console Window Host) as a child process. This is normal and expected behavior in Windows.
Why does conhost.exe appear?
conhost.exe is responsible for providing the graphical console window for command-line applications like PowerShell, Command Prompt (cmd.exe), or other console-based tools.
When you launch PowerShell (or any console application):
PowerShell (or cmd.exe) starts.
Windows creates a console window to display the output.
conhost.exe is spawned to manage the console window—handling input, rendering text, enabling features like window resizing, and processing copy-paste actions.
The PowerShell process (or cmd) is attached to this console window, and conhost.exe acts as a bridge between the command-line process and the graphical interface.
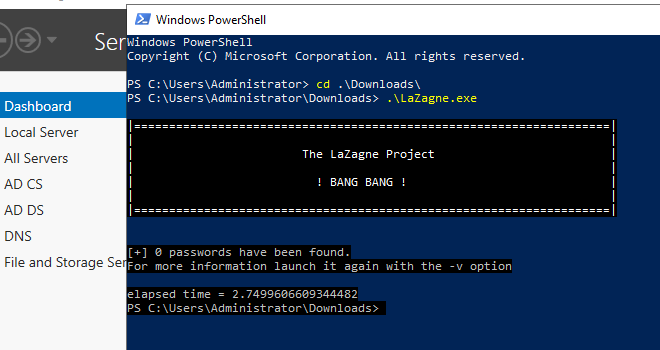
Let's now move on to our final step in Lima Charlie which is creating our custom detection rule for a credential accesss hack tool called Lazagne.
On your Windows machine open edge or download it if you don't have it and navigate to https://github.com/AlessandroZ/LaZagne. Click the latest release. Then download the exe file on the next page.


SmartScreen will pick it up but select keep and then keep anyway.
then keep anyway.


It was still blocked. Delete the old one from downloads first. Then go into virus and threat protection

Manage settings.

Temporarily turn of Virus and Threat Protection

Now download again. Click keep and keep anyway and it should download successfully this time.

Let us run it from PowerShell to see how the log details for its execution is written in LimaCharlie. We then will be able to use that info to help us in creating a custom detection rule.
Navigate to the downloads folder in PowerShell. Start typing La then press Tab on the keyboard.

In LimaCharlie, on the sensor, let us check the timeline to see if we find any activities that correlate to Lazagne execution. Scroll to the bottom since it has the most recent and work your way up a little slowly to see if you find Lazagne process creation. If not you can simply search for Lazagne.

Here we see the NEW_PROCESS event For LaZagne.exe being executed, click on the log entry and open a new tab for Lima Charlie (https://app.limacharlie.io/) for us to create a detection.

You might still be on the sensor page so you will have to go back.

Then navigate to detection rules by clicking "Go to Detect & Response rules". Before you do that though, click "View extension" for ext-sigma to get additional detections.


By subscribing to the available sigma rules we now have more rules.
When creating rules it is a good idea to use a similar rule as a template for our rule. Lets see if we find any credential access related rules. Oops we only have 11 rules which all appear not to be useful.
To the docs we go.
So read this as it gives us an idea of how rules in LimaCharlie work: https://docs.limacharlie.io/docs/detection-and-response
Then we will use one of these examples as a reference or template: https://docs.limacharlie.io/docs/detection-and-response-examples
In the second link, let's use the example for wanna cry as a base for our detection rule

Select New rule in Detection & Response rules.
We also have a quick example of what a detection rule could look like. Let's populate it with the info from the activity logged from the new process creation of LaZagne

Your hash would be different but the idea is to paste the hash and relevant fields from the LaZagne new process log in Timeline section in the sensor section . Read the LimaCharlie documentation to get a better understanding of how there logs can be utilized.
Please note that spacing and indentation matter here.

Scroll down to the bottom you will see that we can test the target event.

Copy the log.

Paste it to test it.

It works.

Name it and create.

Now time to test, execute LaZagne again on the machine.
Go back and we are going to navigate to the detections section.


We see an alert was triggered here.

Good work!
Check out part 2 below.
Comentários